Showing posts with label Halloween. Show all posts

Monday, October 24, 2011

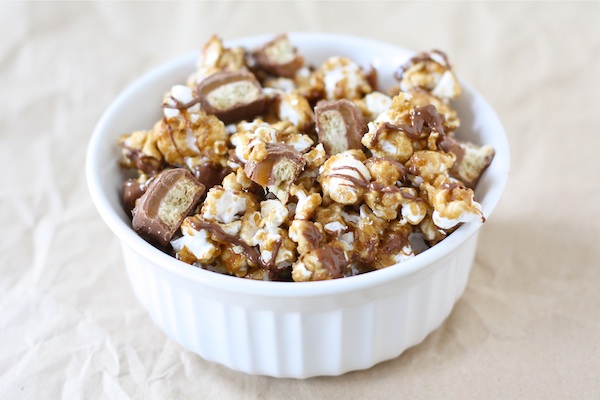
Twix Caramel Popcorn

Caramel popcorn is one of our favorite fall snacks. One day I decided to jazz it up with one of my favorite candy bars – Twix. All I can is, “Wow!” Sweet and crunchy, this is the perfect sweet snack for movie night, game day and Halloween. This is super easy to make but looks oh-so-gourmet.

Twix Caramel Popcorn
Makes a lot!

Ingredients
5 quarts plain air popped popcorn
1 cup butter
2 cups light brown sugar
1/2 cup light corn syrup
1 teaspoon salt
1/2 teaspoon baking soda
1 teaspoon vanilla extract
20 "fun size" Twix candy bars, chopped
2 cups semi-sweet chocolate chips, melted-to drizzle over popcorn

Directions
Preheat oven to 250 degrees F. Place popcorn in a large bowl and set aside.

In a medium saucepan over medium heat, melt butter. Stir in brown sugar, corn syrup, and salt. Bring to a boil, stirring constantly. Boil without stirring for 4 minutes. Remove from heat and stir in baking soda and vanilla extract. Pour caramel in a thin stream over popcorn, stirring to coat. Gently stir until all of the popcorn is covered.

Place popcorn on two large shallow baking sheets and bake in preheated oven, stirring every 15 minutes, for about an hour. Remove popcorn from oven and let cool completely.

Break popcorn into pieces and mix in chopped Twix candy bars. Drizzle popcorn with melted chocolate. Let the popcorn sit until chocolate hardens, about 30 minutes. Store at room temperature in an airtight container.

Thursday, October 28, 2010

Ooey Gooey Pumpkin Cakes

Don’t get me wrong, I love pumpkin pie but it’s kind of boring. This is a great take on this traditional dessert. Totally decadent, simply sweet and utterly delicious, you’ll probably only make this once a year. But trust me; they’ll want you to make it an annual thing.

Ooey Gooey Pumpkin Cakes
Serves 8

Ingredients
Cake:
1 (18 1/4-ounce) package yellow cake mix
1 egg
8 tablespoons butter, melted

Filling:
1 (8-ounce) package cream cheese, softened
1 (15-ounce) can pumpkin
3 eggs
1 teaspoon vanilla extract
8 tablespoons butter, melted
1 (16-ounce) box powdered sugar
1 teaspoon ground cinnamon
1 teaspoon grated nutmeg
Fresh whipped cream, for topping
Candy for toppings (recommended: M and M's, Reese's pieces, crushed Snickers, mini chocolates, peanuts)
Special Equipment: 10 (5-inch) removable bottom tart pans

Directions
Preheat oven to 350 degrees.

Cake:
Combine the cake mix, egg and butter and mix well with an electric mixer. Divide the mixture into 10-equally sized balls. Flatten each ball with the palm of your hand and gently press into the bottom of each tart pan.

Filling:
In a large bowl, beat the cream cheese and pumpkin until smooth with an electric mixer. Beat in eggs, vanilla and butter. Add the powdered sugar, cinnamon, nutmeg, and mix well. Spoon a scant ½ -cup of the pumpkin mixture over cake batter in the tart pans and bake for about 40 minutes. Make sure not to over bake as the center should be a little gooey. Let cool in the pans for 10 minutes before removing.

Serve with fresh whipped cream and candy topping.

Tuesday, October 26, 2010

Snake Bites

This is such an easy and fun recipe. Perfect for a kids party or the Halloween office potluck. People will think you are amazingly creative with this one.

Snake Bites
Serves 10

Ingredients
1 can crescent rolls
Flour, for dusting
4 tablespoons spicy mustard
10 ounces thinly sliced ham
10 ounces thinly sliced salami
12 ounces Monterey Jack, grated
Liquid food coloring
3 egg yolks
2 whole cloves
Toothpicks
2 small pimiento-stuffed olives
1 (1-inch) strips jarred roasted red peppers

Directions
Preheat the oven to 375 degrees.

Line a cookie sheet with foil. Grease the foil and set aside.

Dust a flat surface lightly with flour. Spread out the crescent dough — do not separate. Pinch together the seams so that you have 1 piece of dough. Roll out to make a large rectangle. Make sure the dough is not stuck to the surface at all.

Brush the dough with the mustard, leaving a 1-inch border. Layer the meats down the center of the rectangle, leaving a 1-inch border on either end. You can feel free to use your favorite cold cuts.

Top the meats with the cheese. Fold 1 side of the dough over the filling, lengthwise. Then, fold the other ½ over and press the seal the filling inside. Take 1 egg yolk, and beat lightly with a fork. Brush the egg yolk over the top of the dough. The yolk will act as the glue to hold. Fold the dough in ½ again lengthwise. Pinch the seam with your fingers to seal. Press the outside of the dough to make sure everything is sealed tight and to make an even thickness for the body of your snake. Taper 1 end of the dough to form a tail shape. Form the other end into a head shape.

Beat the 2 remaining egg yolks together. Transfer to 3 separate small bowls. Add some food coloring to each bowl — whatever colors you like! Using a clean paintbrush, "paint" the snake with the egg yolk/food coloring mixture.

Transfer the snake to the foil lined sheet tray. Form into an "s" shape so it looks like the snake is slithering. Insert 2 cloves into the head to look like nostrils and 2 stuffed olives for eyes. Create a mouth or tongue with the roasted red peppers. Bake the snake for 25 minutes or until golden brown and cooked through.

Monday, October 25, 2010

Pumpkin Waffles with Trail Mix Topping

Halloween falls on a Sunday this year, so ease into the scariest day of the year with this simple fall brunch recipe. Simply divine, these waffles taste like fluffy pumpkin pie for breakfast.

Pumpkin Waffles with Trail Mix Topping
Serves 4

Ingredients
For the Waffles:
1 ½ cups pumpkin puree (pumpkin pie filing)
2 ¼ cups all-purpose flour
1 teaspoon baking powder
½ teaspoon baking soda
1 teaspoon salt
2 teaspoons pumpkin-pie spice
½ cup packed light brown sugar
2 large eggs, separated
¼ cup plain Greek yogurt
1 cup whole milk
4 tablespoons unsalted butter, melted

For the Topping:
¼ cup slivered almonds
¼ cup raw sunflower seeds
1 ½ tablespoons pure maple syrup
Coarse salt
¼ cup dried cherries or cranberries
Whipped cream, for serving (optional)

Directions
Make the topping: Put the almonds, sunflower seeds and syrup in a bowl; mix thoroughly. Spread on 2 baking sheets lined with silicone mats or parchment paper and season with salt; bake until just golden, stirring several times, about 20 minutes. Cool completely on the pan, and then toss with the dried cherries.

Make the batter: Whisk the flour, baking powder, baking soda, salt and pumpkin-pie spice in a bowl. Whisk the sugar and egg yolks in a separate bowl, then whisk in 1 ½ cups strained pumpkin puree, the yogurt and milk. Whisk in the melted butter. Pour the pumpkin mixture into the flour mixture and stir with a rubber spatula until just combined (it will be lumpy). Beat the egg whites with a mixer until stiff, and then gently fold into the batter.

Cook the waffles: Preheat a waffle iron and grease it if it's not nonstick. Spoon in the batter and cook until golden brown. Keep warm in a 250 degree oven (directly on the rack) until serving. Serve with whipped cream, if desired, and sprinkle with the topping.

Thursday, October 21, 2010

Severed Fingers Halloween Cookies

This is a killer bite. Make this clever, creepy and downright gruesome recipe for your spooky soiree.

Severed Fingers Halloween Cookies
Makes 30 cookies

Ingredients
2 tablespoons red food coloring
30 blanched almonds
2 large eggs
¼ teaspoon vanilla extract
8 tablespoons (1 stick) unsalted butter, at room temperature
½ cup confectioners' sugar
5 tablespoons granulated sugar
1 pinch salt
1 2/3 cups all-purpose flour

Directions
Heat oven to 350°. Line two baking sheets with Silpats (French nonstick baking mats) or parchment paper, and set aside.

Place food coloring in a shallow bowl. Crack each whole almond into halves and toss them into the bowl with the food coloring and stir them until the color is evenly distributed. Leave them in the bowl and stir them every so often until the color is as dark as you like.

Separate 1 egg. Set aside the white. In a small bowl, whisk together yolk, remaining egg, and vanilla. Set aside.

In the bowl of an electric mixer fitted with the paddle attachment, combine butter, confectioners' sugar, granulated sugar, and salt. Beat on medium speed until well combined. Add egg mixture, and beat until smooth, about 2 minutes. Add the flour, and mix on low speed just until incorporated. Wrap the dough in plastic, and chill until firm, 20 to 30 minutes.

Divide the dough in half. Work with one piece at a time, keeping remaining dough covered with plastic wrap and chilled. Divide the first half into fifteen pieces. On a lightly floured surface, roll each piece back and forth with palms into finger shapes, 3 to 4 inches long. Pinch dough in two places to form knuckles. Score each knuckle lightly with the back of a small knife. Transfer fingers to prepared baking sheets. Repeat with remaining dough.

When all fingers are formed, brush lightly with egg white. Position almond nails; push into dough to attach.

Bake until lightly browned, about 12 minutes. Cool completely.

Monday, October 11, 2010

Peanut Butter Pumpkins

Want your kids to think you’re the coolest mummy around? Make this tricked-out treat and they’ll be singing your praises – at least until all the ghastly goodies are gobbled up. And, of course, I have the perfect peanut butter treat this Halloween – Peanut Butter Pumpkins!

Peanut Butter Pumpkins
Yields 15

Ingredients
½ cup butter
1 ½ cups peanut butter
1 (16 ounce) package confectioner’s sugar, sifted
Red food coloring
Yellow food coloring
Green decorators icing

Directions
Melt butter in large bowl and add a few drops of yellow and red food coloring, until mixture has a nice orange color.

Add the peanut butter and confectioners’ sugar and mix together until a dough-like consistency is reached (This mean that when the dough is nice and stiff and it gets hard to add any more sugar, to let it go at that).

Shape dough into small balls shaped like pumpkins; make ridges on the pumpkins with a toothpick.

Add a small amount of green decorators icing to the top of each pumpkin for a stem.

Refrigerate if desired, to allow pumpkins to firm.

Serve on a plate lines with toasted coconut and Halloween decorated cookies, if desired; these also look good on cupcakes.

Wednesday, October 6, 2010

Wicked Cupcakes

Serve up some Halloween fun with this ghoulishly good dessert. These chocolate cupcakes are fun to make and delicious to eat. Get all the ingredients ready and enlist your kids to help decorate. I’m not a baker so I take a little help from Betty Crocker with the cupcakes.

Wicked Cupcakes
Makes 1 dozen cupcakes

Ingredients
Cupcakes:
1 box of your favorite chocolate cake mix

Frosting:
½ cup (1 stick) unsalted butter, at room temperature
1 cup peanut butter (smooth or chunky)
4-ounces cream cheese, at room temperature
4 cups confectioners' sugar
2 tablespoons milk
1 drop food coloring (green), optional
Chocolate wafer cookies
Licorice strips
Toasted coconut
Small candies
Special equipment: 12 (1/2-cup) muffin cups with paper liners

Directions
For the cupcakes: Cook the cake box according to the directions.

For the frosting: Beat the butter, peanut butter, and cream cheese in a large bowl with an electric mixer until light and fluffy. Gradually add the confectioners' sugar and milk mixing until the frosting is smooth. Add food coloring as desired. Refrigerate the frosting until firm.

To decorate the cakes: For the witch’s hat, score a circle in the middle of a cupcake. Cut a deep cone-like shape with a knife held at an angle. Rotate the cupcake to complete the circle and remove the center. Repeat with all the cupcakes. Generously scoop or pipe enough frosting into the center of each cupcake to fill the hole and to come over the cake to make a face. Top with a chocolate wafer cookie. Put a dot of frosting in the middle of the wafer cookie and invert the cone shaped piece of cake on top to make a witches hat. Use skinny licorice, toasted coconut or cereal flakes for hair and candies for eyes and/or nose. Refrigerate for up to 30 minutes before serving.