
Wednesday, October 26, 2011
Roasted Vegetable Minestrone

Baby it's cold outside and what better way to cozy up than with a big bowl of soup? I love minestrone soup. It's hearty and chock-full of vegetable. And it's one of the few non-cream-based soups that my daughters like. It's perfect for a weeknight meal. Voila! Dinner's served!
Roasted Vegetable Minestrone
Serves 6 to 8
Ingredients
2 whole zucchini, halved, cut into strips, then cubed
2 whole summer squash, halved, cut into strips, then cubed
8 ounces, weight mushrooms, stems removed and quartered
2 tablespoons olive oil
Kosher salt to taste
2 tablespoons (additional) olive oil
2 whole carrots, sliced
1 whole medium onion, diced
3 stalks celery, sliced (leaves included)
8 cups low sodium chicken broth
2 cans cannellini beans, rinsed
1 cup (heaping) cut green beans, fresh or frozen
1 1/2 cup medium or small pasta shells, uncooked
1 can (14.5) diced tomatoes with juice
Salt and pepper, to taste
Parmesan cheese, shaved
Directions
Preheat oven to 500 degrees.
Toss cubed zucchini, squash, and mushrooms in a bowl with olive oil and a sprinkling of kosher salt. Arrange onto two sheet pans (to avoid crowding) and roast in the hot oven for 5 to 10 minutes, or until brown and black parts begin to show. Remove from oven and set aside.
In a heavy pot, heat olive oil over medium heat. Add carrots, onions, and celery and stir to cook for 3 minutes. Pour in broth and bring to a boil. Reduce heat to low and simmer for ten minutes.
Add cannelini beans and green beans. Cook on low for five minutes. Add pasta and cook for an additional five minutes. Add canned tomatoes, stir, and cook for an additional five minutes on low heat. Check for seasonings, adding salt and pepper.
Add roasted vegetables at the very end. Stir and allow to simmer and heat for a few minutes before serving. Be sure to check seasoning! Add more broth if necessary to increase liquid amount.
Serve with Parmesan shavings and crusty Italian bread.
Tuesday, October 25, 2011
Gooey Butter Cake
 The title of this cake alone sold me. Gooey? Butter? Count me in! I didn’t need any more convincing. And, quite frankly, nor will you. Apparently, Gooey Butter Cake is a tradition is St. Louis often served at breakfast. But you don’t necessarily need to eat this for breakfast. Snack, dessert – anytime is a good time to eat this cake.
Gooey Butter Cake
Ingredients
For the crust:
1 package (18.25 Oz. Box) plain yellow cake mix
1 stick unsalted butter, melted
1 whole egg
For the filling:
8 ounces, weight cream cheese, at room temperature
2 whole eggs
1 teaspoon pure vanilla extract
1 stick unsalted butter, melted
3-¾ cups confectioner's sugar
Directions
Preheat oven to 350°. Prepare crust first. In a large mixing bowl, combine the crust ingredients with a wooden spoon until moist. Transfer to a 13″x9″ ungreased baking pan and spread evenly over the bottom of the pan. Set aside.
Next, prepare the filling. In a large mixing bowl, beat cream cheese with an electric mixer until fluffy. Add the eggs, vanilla, and melted butter, and continue to mix. Next, add the confectioner’s sugar one cup at a time until all sugar is mixed in. Pour filling over the crust, and spread evenly with a spatula.
Bake gooey butter cake for 40-45 minutes until it is browned, but the center is still jiggles when the pan is shaken. Cool for 30 minutes. Sprinkle with additional confectioner’s sugar and serve.
Monday, October 24, 2011
Twix Caramel Popcorn
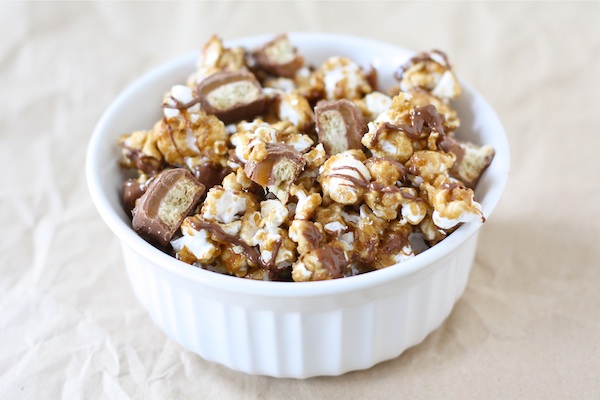 Caramel popcorn is one of our favorite fall snacks. One day I decided to jazz it up with one of my favorite candy bars – Twix. All I can is, “Wow!” Sweet and crunchy, this is the perfect sweet snack for movie night, game day and Halloween. This is super easy to make but looks oh-so-gourmet.
Twix Caramel Popcorn
Makes a lot!
Makes a lot!
Ingredients
5 quarts plain air popped popcorn
1 cup butter
2 cups light brown sugar
1/2 cup light corn syrup
1 teaspoon salt
1/2 teaspoon baking soda
1 teaspoon vanilla extract
20 "fun size" Twix candy bars, chopped
2 cups semi-sweet chocolate chips, melted-to drizzle over popcorn
5 quarts plain air popped popcorn
1 cup butter
2 cups light brown sugar
1/2 cup light corn syrup
1 teaspoon salt
1/2 teaspoon baking soda
1 teaspoon vanilla extract
20 "fun size" Twix candy bars, chopped
2 cups semi-sweet chocolate chips, melted-to drizzle over popcorn
Directions
Preheat oven to 250 degrees F. Place popcorn in a large bowl and set aside.
In a medium saucepan over medium heat, melt butter. Stir in brown sugar, corn syrup, and salt. Bring to a boil, stirring constantly. Boil without stirring for 4 minutes. Remove from heat and stir in baking soda and vanilla extract. Pour caramel in a thin stream over popcorn, stirring to coat. Gently stir until all of the popcorn is covered.
Place popcorn on two large shallow baking sheets and bake in preheated oven, stirring every 15 minutes, for about an hour. Remove popcorn from oven and let cool completely.
Break popcorn into pieces and mix in chopped Twix candy bars. Drizzle popcorn with melted chocolate. Let the popcorn sit until chocolate hardens, about 30 minutes. Store at room temperature in an airtight container.
Friday, October 21, 2011
Pumpkin Cheesecake
 I’ve gone through many simple no-bake cheesecakes in premade graham cracker crusts. And they were good. But they were nowhere near as good as making one from scratch. And this one is about as perfect a pumpkin cheesecake that you will make. You’re welcome.
Pumpkin Cheesecake
Ingredients
For the crust:
1-3/4 cup gingersnap cookie crumbs, from about 40 gingersnap wafers
3 tablespoons brown sugar
½ tsp. ground cinnamon
½ tsp. salt
4 tablespoons unsalted butter, melted and slightly cooled down
For the filling:
3 8-ounce packages regular cream cheese (not low fat or nonfat), at room temperature
1 15-ounce can pureed pumpkin (not pumpkin pie filling)
3 large eggs plus 1 egg yolk
1/4 c. sour cream
1-1/2 c. sugar
1 tsp. ground cinnamon
1/2 tsp. ground ginger
1/8 tsp. ground nutmeg
1/8 tsp. ground cloves
1/4 tsp. salt
2 T. all-purpose flour
1 tsp. vanilla
Directions
Preheat oven to 350°. Prepare a 9″ spring form pan by lightly spraying with cooking spray.
For the crust, pulse the cookies in a food processor until the crumbs are uniform. Add the brown sugar, cinnamon, and salt and pulse to combine. Transfer to a medium bowl and add the melted butter. Combine thoroughly with a fork. When the mixture is evenly moist, crumbly, and holds together when you squeeze a handful, it’s ready. Press the mixture evenly over the bottom, and very slightly up the sides, of your spring form pan. Chill for 5 minutes, and then bake for 10 minutes. Let cool completely.
Prepare a water bath while the crust cools. Heat a kettle or pan of water to a soft boil. Have a larger baking dish or roasting pan ready to set the spring form pan inside of. Once the crust is cooled, set the spring form pan on a double layer of heavy duty aluminum foil and wrap the foil up around the outside of the pan.
Thursday, October 20, 2011
Roasted Tomato Basil Soup

I’ve been looking high and low for the perfect tomato soup recipe. And this one just might be it. Roasted Tomato Basil Soup is one of my all-time favorite soups. Don’t be intimidated by the roasting part of the recipe. Roasting tomatoes is so easy and really brings out the best flavor. If you’re lucky enough to have any leftovers, put it in the freezer so you can enjoy a tasty meal without doing any work.
Roasted Tomato Basil Soup
Serves 4 to 6
Ingredients
2 ½ pounds Roma tomatoes, cut in half lengthwise
4 tablespoons olive oil, divided
Salt and pepper, to taste, for seasoning tomatoes
1 medium onion, chopped
4 cloves of garlic, minced
Dash of red pepper flakes
1 cup freshly chopped basil
1 (15 ounce) can diced tomatoes
4 cups vegetable broth (you can use chicken broth)
Salt and pepper, to taste
Directions
Preheat oven to 400 degrees. Spread the tomatoes on a baking sheet and drizzle with 2 tablespoons of olive oil. Season with salt and pepper and roast for about 45 minutes.
In a large stockpot, heat the other 2 tablespoons of olive oil over medium heat. Add the onion and cook until tender, about 203 minutes. Stir in the garlic and red pepper flakes. Cook for another 2-3 minutes. Add the canned tomatoes, fresh basil and vegetable broth. Stir in the roasted tomatoes. Cook for about 30minutes over medium-low heat.
Use an immersion blender to puree the soup in the stockpot, or transfer soup to a food processor or blender to blend. The soup should be smooth, with a few tomato chunks. Season with salt and pepper, to taste, and serve warm.
Preheat oven to 400 degrees. Spread the tomatoes on a baking sheet and drizzle with 2 tablespoons of olive oil. Season with salt and pepper and roast for about 45 minutes.
Wednesday, October 19, 2011
Spaghetti ala Carbonara
 I found a new pasta recipe that my kids absolutely love. And let me tell you – they loved it so much, there weren’t any leftovers. Now, that’s a good recipe. Not to mention, it’s incredibly easy to make with ingredients you already have in your pantry. It doesn’t get much simpler – or tastier – than that.
Spaghetti ala Carbonara
Serves 4
Serves 4
Ingredients
Salt
2 tablespoons olive oil
¾ cup pancetta, cut into ¼ -inch dice
1 pound spaghetti
8 large eggs
½ cup grated Parmesan
½ cup grated pecorino
Freshly ground black pepper
4 scallions, cut on a severe bias
Salt
2 tablespoons olive oil
¾ cup pancetta, cut into ¼ -inch dice
1 pound spaghetti
8 large eggs
½ cup grated Parmesan
½ cup grated pecorino
Freshly ground black pepper
4 scallions, cut on a severe bias
Directions
Bring a large pot of well salted water to a boil over medium heat.
Bring a large pot of well salted water to a boil over medium heat.
Add about 2 tablespoons olive oil to a large skillet over medium heat. Add the pancetta a medium heat and cook until it starts to color and become crisp. Turn off the heat and reserve.
Drop the pasta into the salted boiling water and cook it 1 minute less than it says on the package, usually about 6 to 7 minutes. Bite the pasta to check the consistency.
While the pasta is cooking, crack the eggs into a large mixing bowl. Add the grated cheeses and season with salt. Whisk vigorously until it becomes a homogenous. Season generously with black pepper.
When the pasta is just about done, return the pan with the pancetta to medium heat. Remove the pasta from the cooking water. Toss or stir the pasta into the pancetta to coat the pasta with the remaining fat in the skillet. Immediately vigorously stir the egg mixture into the pasta. Cook for 1 to 2 minutes, stirring constantly until the egg mixture looks like a cream sauce.
Serve immediately garnished with sliced scallions.
Tuesday, October 18, 2011
Bowtie Lasagna
 My girls love pasta and, boy, did I find a recipe that takes one of the least amounts of time to make – bowtie lasagna! This could not have been easier. I was able to throw this together in less than twenty minutes – perfect for a busy, working, errand-running mom like me! It was heaven.
Bowtie Lasagna
Serves 6
Serves 6
Ingredients
1 pound hamburger
5 cups bow tie noodles
3 cups spaghetti sauce
1 tablespoon olive oil
1 teaspoon salt
½ teaspoons garlic powder
1 teaspoon Italian seasoning
½ cups mozzarella cheese
½ cups sour cream
1 pound hamburger
5 cups bow tie noodles
3 cups spaghetti sauce
1 tablespoon olive oil
1 teaspoon salt
½ teaspoons garlic powder
1 teaspoon Italian seasoning
½ cups mozzarella cheese
½ cups sour cream
Directions
Brown hamburger in small pan. Meanwhile, cook noodles according to package directions.
After noodles are cooked, drain and drizzle with olive oil. Mix in your spaghetti sauce
Add your fried hamburger, seasonings, cheese, and sour cream. Fold together and allow it all to combine and melt together, over low heat, for about 5 minutes, or until cheese is melted.
Serve to your family and be prepared to have it disappear before your very eyes.
Monday, October 17, 2011
Baked Pumpkin Donut Holes
 Technically, these aren’t really donuts so you don’t have to feel guilty about indulging in them. Instead, they’re mini muffins. Yahoo! I love that these donut holes are baked and not fried. Soft, cakey and with a nice pumpkin flavor, your family will no doubt devour these donut holes. They won’t be able to stop popping them in their mouth. It’s the perfect fall breakfast treat or snack. Get out the pumpkin and make a batch today!
Baked Pumpkin Donut Holes
Makes 24 donut holes
Makes 24 donut holes
Ingredients
For the Donuts:
1 ¾ cups all-purpose flour
2 teaspoons baking powder
½ teaspoon salt
½ teaspoons cinnamon
½ teaspoons nutmeg
½ teaspoon allspice
1/8 teaspoons ground cloves
1/3 cup canola oil
½ cup light brown sugar
1 large egg
1 teaspoon vanilla extract
¾ cup canned plain pumpkin (not pumpkin pie filling)
½ cup milk
For the Coating:
4 tablespoons unsalted butter, melted
2/3 cup granulated sugar
2 tablespoons cinnamon
4 tablespoons unsalted butter, melted
2/3 cup granulated sugar
2 tablespoons cinnamon
Directions
Preheat oven 350°F. Spray a 24-cup mini muffin tin with baking spray and set aside.
Preheat oven 350°F. Spray a 24-cup mini muffin tin with baking spray and set aside.
In a medium bowl, whisk together flour, baking powder, salt, cinnamon, nutmeg, allspice, and cloves. In separate, large bowl whisk together oil, brown sugar, egg, vanilla, pumpkin and milk until smooth. Add dry ingredients to wet ingredients and mix until just combined.
Divide batter evenly among muffin cups. Bake for 10-12 minutes or until a toothpick comes out clean.
While the muffins bake,melt butter in one bowl and combine granulated sugar and cinnamon in another bowl. Remove muffins from oven and cool for 2 minutes. Dip eahc muffin in melted butter, then roll in cinnamon sugar to coat. Serve muffins warm or at room temperature.
Friday, October 14, 2011
Hot Chile Grilled Cheese
 This is a grown-up grilled cheese. It is a deconstructed version of a Chile relleno turned sandwich and packs some heat and ooey-gooey filling. I like the flavor of sourdough, but any kind of bread will work well. Pair with the classic tomato basil soup and you have one awesome meal.
Hot Chile Grilled Cheese
Serves 4
Ingredients
4 poblano peppers (see Note)
1 14-ounce can pinto beans, preferably low-sodium
½ tsp. cumin
½ tsp. chili powder
3 tablespoons prepared salsa
1/8 teaspoon salt
1 cup shredded Monterey Jack or Cheddar cheese
4 tablespoons low-fat plain yogurt
8 slices sourdough bread
Directions
Place peppers in preheated over (350 degrees) and roast 10 to 15 minutes. Once roasted, put in paper bag and wait until cool enough to handle.
Meanwhile, combine beans, salsa and salt in a medium bowl. Mash the beans with a fork until they begin to form a paste (some can remain whole) and add cumin and chili powder and hot pepper sauce to taste. Combine cheese and yogurt in a small bowl.
When the peppers are cool enough to handle, remove char and slice each one in half lengthwise and remove the stem and seeds.
Heat a Panini maker to high.
Spread 1/3 cup of the bean mixture on each of 4 slices of bread. Top with a heaping tablespoon of the cheese mixture. Place 2 pepper halves over the cheese. Cover with the remaining slices of bread.
Grill the sandwiches in the Panini maker until golden brown and through, about 4 minutes. Cut in half and serve immediately.
Thursday, October 13, 2011
Teriyaki Pork Tenderloin
 I get so tired of finding 1,001 chicken recipes. So, every now and then I like to live on the wild side and make pork. Pork… the other white meat. This recipe is simple and delicious. What more can you ask for? Oh yeah, it’s also tender and makes delicious teriyaki pork sandwiches the next day. That is, if you have any leftovers.
Teriyaki Pork Tenderloin
Serve 3 to 4
Ingredients
2 tablespoons low-sodium soy sauce
1 tablespoon canola oil
1 tablespoon brown sugar
1 tablespoon dry sherry
1 tablespoon rice vinegar
1 garlic clove, crushed with a garlic press or minced
1/2 teaspoon finely grated fresh ginger
Pinch red pepper flakes
1 pound pork tenderloin
Directions
Combine the soy sauce, oil, sugar, sherry, vinegar, garlic, ginger and red pepper flakes, and stir until the sugar dissolves. Transfer to a resealable plastic bag and add the pork tenderloin. Seal the bag and marinate the pork in the refrigerator, turning once, for 1/2 hour, or up to 8 hours.
Preheat the broiler. Place the pork on a roasting pan and broil for 15-20 minutes, turning once.
Wednesday, October 12, 2011
Fettuccini Alfredo with Zucchini Ribbons

My husband loves fettuccine alfredo and while I do as well, my thighs and butt do not. Thank goodness for this recipe then. It saves the day. It is a good, low fat version of the classic. Yet, it still feels like you’re indulging. Now, you can save the guilty version for a special occasion or splurge. But in the meantime…
Fettuccini Alfredo with Zucchini Ribbons
Serves 4
Ingredients
2 tablespoons olive oil
2 cloves garlic, minced
2 medium zucchini (about 8 ounces each)
12 ounces fettuccini pasta, preferably whole wheat
1 tablespoon all-purpose flour
1 cup cold 1% low-fat milk
½ cup evaporated skim milk
½ teaspoon salt, plus more to taste
¾ cup freshly grated Parmesan cheese
¼ cup finely chopped fresh parsley leaves
Slice the ends off the zucchini and discard. Using a mandolin or carefully with a sharp knife slice the zucchini lengthwise into very thin slices. Stack the slices and cut with a kni]fe lengthwise into 1/4 inch-thik ribbons.
Heat 1 tablespoon of the oil in large non-stick skillet over a medium heat. Add 1 clove of the garlic and cook for 30 seconds. Add the zucchini ribbons, cover and cook until the zucchini is tender, stirring occasionally, about 6 minutes. Transfer the zucchini to a bowl.
Cook the pasta al dente according to the directions on the package. Ladle out a half cup of the pasta water and set aside. Drain the pasta and return it to the pasta pot.
Meanwhile, make the sauce. Stir the flour into the low-fat milk until it is completely dissolved. Put the remaining tablespoon of olive oil in the skillet and heat over a medium-high heat. Add the remaining clove of garlic and cook for 30 seconds. Add the flour-milk mixture and cook until the mixture begins to boil, stirring constantly. Reduce heat to low and cook, stirring, for 2 minutes more. Add the evaporated milk, salt and the cheese and cook, stirring, until the cheese is melted, about 1 minute. Season with additional salt to taste.
Add the sauce, the zucchini and 3 tablespoons of the parsley to the pasta in the pot and toss to combine. Add a little of the reserved pasta water as necessary to loosen.
Tuesday, October 11, 2011
Pot Roast
 I usually cook my pot roast in slow cooker for the sheer convenience. However, if you have the time to do this recipe in a Dutch oven, it is well worth the time, effort and investment.
 My favorite cut of meat for pot roast is the chuck roast because it has beautiful marbling throughout the meat and it ends up being tender and melt-in-your-mouth delicious. The most important thing to remember for any pot roast recipe is patience. If you can find the patience (to resist the irresistible aromas wafting through the kitchen as it cooks), you won’t be disappointed. I promise.
Pot Roast
Serves 10
Serves 10
Ingredients
1 whole (4 to 5 pounds) chuck roast
2 tablespoons olive oil
2 whole onions
6 whole carrots (up to 8 carrots)
Salt to taste
Pepper to taste
1 cup red wine (optional, you can use beef broth instead)
2 cups to 3 cups beef stock
3 sprigs fresh thyme, or more to taste
3 sprigs fresh rosemary, or more to taste
Directions
First and foremost, choose a nicely marbled piece of meat. This will enhance the flavor of your pot roast like nothing else. Generously salt and pepper your chuck roast.
Heat a large pot or Dutch oven over medium-high heat. Then add 2 to 3 tablespoons of olive oil (or you can do a butter/olive oil split).
Cut two onions in half and cut 6 to 8 carrots into 2-inch slices (you can peel them, but you don’t have to). When the oil in the pot is very hot (but not smoking), add in the halved onions, browning them on one side and then the other. Remove the onions to a plate.
Throw the carrots into the same very hot pan and toss them around a bit until slightly browned, about a minute or so.
If needed, add a bit more olive oil to the very hot pan. Place the meat in the pan and sear it for about a minute on all sides until it is nice and brown all over. Remove the roast to a plate.
With the burner still on high, use either red wine or beef broth (about 1 cup) to deglaze the pan, scraping the bottom with a whisk to get that entire wonderful flavor up.
When the bottom of the pan is sufficiently deglazed, place the roast back into the pan and add enough beef stock to cover the meat halfway (about 2 to 3 cups). Add in the onion and the carrots, as well as 3 or 4 sprigs of fresh rosemary and about 3 sprigs of fresh thyme.
Put the lid on, and then roast in a 275F oven for 3 hours (for a 3-pound roast). For a 4 to 5-pound roast, plan on 4 hours.
Monday, October 10, 2011
Shrimp Tacos with Grilled Poblano Salsa
 Okay, I’m done with the pumpkin recipes… for now. Even though fall is here, you can always use one more barbecue recipe and this is definitely it! I mean, by the end of the week we’ll be back up to the ’90s again. What the?!?! Anyhow, I’ve made these countless times this past summer and it’s my go-to recipe for when I need a great healthy meal.
The real kicker in this recipe isn’t the shrimp though—it’s the salsa! By grilling all of the ingredients in the salsa, it really ramps up the flavor big time. In it, fresh corn, cherry tomatoes and poblano pepper are grilled and tossed with creamy diced avocado, cilantro and lime juice. I promise this will be a favorite for years to come!
Shrimp Tacos with Grilled Poblano Salsa
Ingredients
For the salsa:
1 ear corn, husked
6 scallions, white and light green parts only (about 5 inches)
1 poblano Chile
1 cup cherry tomatoes, halved
1 large (or 2 small) haas avocado
1 small bunch cilantro, minced
Juice of two small limes
1 clove garlic, minced
1/2 teaspoon salt
1 tablespoon olive oil
1 ear corn, husked
6 scallions, white and light green parts only (about 5 inches)
1 poblano Chile
1 cup cherry tomatoes, halved
1 large (or 2 small) haas avocado
1 small bunch cilantro, minced
Juice of two small limes
1 clove garlic, minced
1/2 teaspoon salt
1 tablespoon olive oil
For the tacos:
1 lb. shrimp
Corn or whole wheat tortillas
Directions
Heat your grill up to medium high. Brush corn, green onions and poblano Chile with olive oil and place on grill. You want everything to have a nice char to it—to Chile should be black and the corn and onion should be charred. This will take about five minutes, flipping occasionally with tongs.
When done, remove veggies from grill and let cool on a plate. When cool, peel the now black skin off the pepper, remove the seeds and chop into small dice. Run your knife down the corn to remove the kernels from the cob and place into a bowl with the pepper. Chop onion and place into bowl as well. Add chopped avocado, cherry tomatoes and cilantro to the bowl and add lime juice and salt. Season to taste and set aside while you prepare the shrimp.
Wash and devein if necessary then grill only a few minutes until pink. Be careful because shrimp cook extremely quickly! When done, place into tortillas, top with salsa and eat immediately.
Friday, October 7, 2011
Pumpkin Chocolate Chip Bundt Cake
 I’ve said it before. I like to bake though I am not the best decorator, which is why I love bundt cakes. They are pretty and don’t require frosting (besides, I don’t really like frosting and usually scrape it off). If you like frosting, don’t worry; you won’t miss it with this cake.
Pumpkin Chocolate Chip Bundt Cake
Ingredients
2 sticks unsalted butter, at room temperature
2 ¼ cups flour
2 teaspoons baking powder
1 teaspoon baking soda
1 ½ teaspoons cinnamon
¾ teaspoon ground allspice
Pinch of fresh nutmeg
½ teaspoon salt
1 ¼ cups canned solid-pack pumpkin
¾ cup well-shaken buttermilk
1 ½ teaspoons vanilla
1 ¼ cups granulated sugar
3 large eggs
Chocolate chunks or chocolate chips
Directions
Preheat oven to 350°F. Spray a 10 inch bundt pan, then dust with flour, knocking out excess.
Whisk together flour, baking powder, baking soda, cinnamon, allspice, fresh nutmeg, and salt in a bowl. Whisk together pumpkin, buttermilk, and vanilla in a separate bowl.
Beat butter and sugar in a large bowl with an electric mixer at medium speed until creamy. Add in eggs one at a time, while mixing on low. On low, add flour and pumpkin mixtures in batches, beginning and ending with flour mixture. Mix just until combined, don’t over mix. By hand, stir in the chocolate chunks.
Spoon cake batter into pan, smoothing top. Pound the pan on the counter to settle the batter. Bake until a toothpick comes out clean in the center of cake, about 45- 50 minutes. Cool the cake in the pan, on a rack, for 15 minutes. Invert rack over cake and reinvert cake onto rack. Cool completely before serving. Dust with powdered sugar, if desired.
Thursday, October 6, 2011
Cinnamon Streusel Pancakes
 These will be the most amazing pancakes you have ever tasted, trust me. They are light and fluffy and the cinnamon streusel on top goes perfectly with the fall spices. I wish I could tell you how delicious these pancakes are, but there are really no words to describe them. They are too good! You have to make these pancakes. I guarantee that you will fall head over heels for these babies. You won’t be able to get them out of your mind.
Cinnamon Streusel Pancakes
Makes 4
Ingredients
For the cinnamon streusel:
1/2 cup all-purpose flour
1/2 cup brown sugar, packed
1 teaspoon ground cinnamon
6 tablespoons cold unsalted butter, cut into chunks
Makes 4
Ingredients
For the cinnamon streusel:
1/2 cup all-purpose flour
1/2 cup brown sugar, packed
1 teaspoon ground cinnamon
6 tablespoons cold unsalted butter, cut into chunks
To make the pancakes:
3/4 cup all-purpose flour
1/2 cup whole wheat flour
2 tablespoons light brown sugar
2 teaspoons baking powder
1/4 teaspoon salt
1 teaspoon ground cinnamon
1/4 teaspoon nutmeg
1/8 teaspoon ground ginger
1/8 teaspoon ground cloves
1 cup milk
1/2 cup canned pumpkin (not pumpkin pie filling)
1 large egg
2 tablespoons canola oil
1 teaspoon vanilla extract
Directions
First, make the cinnamon streusel. In a medium bowl, combine flour, brown sugar, cinnamon, and butter. Mix together with your hands or a fork, until you have a crumbly mixture. Set aside.
In a large bowl, whisk together flours, brown sugar, baking powder, salt, cinnamon, nutmeg, ginger, and cloves. Set aside.
In a medium bowl, whisk together milk, egg, pumpkin, canola oil, and vanilla extract. Add wet ingredients to the flour mixture and whisk until combined.
Heat a griddle or pan to medium low. Coat with cooking spray. Drop 1/3 cup of batter onto heated skillet. Add 2 tablespoons of the cinnamon streusel. Cook on the first side until bubbles begin to form, about 2-3 minutes. Carefully flip pancake over and cover very generously with cinnamon streusel. Cook for another 2-3 minutes or until golden brown. Continue this process to make the rest of the pancakes.
Serve pancakes warm with maple syrup and butter.
Wednesday, October 5, 2011
Pumpkin Granola
 Obviously, you can see a theme here. This week it’s all about the pumpkin. I love homemade granola. Not only does it taste good, but it makes the house smell amazing. This batch has a fall theme. Pumpkin, applesauce and maple syrup bind the oats together so there is no need for butter or oil. When you make this, the pumpkin spice aroma travels throughout the house and lingers for hours – much better than a pumpkin candle!
Pumpkin Granola
Ingredients
5 cups rolled oats
1 teaspoon pumpkin pie spice
1 teaspoon cinnamon
¼ teaspoon nutmeg
¾ tsp. salt
¾ cup brown sugar
½ cup pumpkin puree
¼ cup applesauce
¼ cup maple syrup
1 teaspoon vanilla extract
¾ cup dried cranberries
½ cup pepitas
5 cups rolled oats
1 teaspoon pumpkin pie spice
1 teaspoon cinnamon
¼ teaspoon nutmeg
¾ tsp. salt
¾ cup brown sugar
½ cup pumpkin puree
¼ cup applesauce
¼ cup maple syrup
1 teaspoon vanilla extract
¾ cup dried cranberries
½ cup pepitas
Directions
Preheat the oven to 325° F. Line a large baking sheet with parchment paper and set aside. In a large bowl, combine oats, spices, and salt. Mix well.
Preheat the oven to 325° F. Line a large baking sheet with parchment paper and set aside. In a large bowl, combine oats, spices, and salt. Mix well.
In a medium bowl, whisk together brown sugar, pumpkin puree, applesauce, maple syrup and vanilla extract. Whisk until smooth. Pour wet ingredients into oat mixture and stir until the oats are evenly coated. They will be moist. Evenly spread the mixture onto the prepared baking sheet.
Bake for 20 minutes. Remove pan from the oven and stir. Bake for an additional 15-20 minutes or until the granola is golden and crisp. Remove from the oven and stir in dried cranberries and pepitas. Let cool completely. Store in an airtight container.
*Note: Serve granola with yogurt, milk, or enjoy plain.
Tuesday, October 4, 2011
Pumpkin Nutella Snack Cake
 This pumpkin Nutella cake is the perfect dessert because it contains pumpkin, is super easy to make and will steal the show at any gathering. It’s moist and spiced with cinnamon, nutmeg and ginger. The Nutella really acts as the frosting. Right before you pop it in the oven you swirl big globs of Nutella throughout the pumpkin batter. The rich chocolate hazelnut Nutella really is the “icing on the cake.”
Pumpkin Nutella Snack Cake
Makes 16 snack cakes
Ingredients
2 cups all-purpose flour
1 ½ teaspoons of cinnamon
½ teaspoon fresh nutmeg
1/4 teaspoon ginger
1 teaspoon baking soda
¾ teaspoon salt
2 sticks unsalted butter, at room temperature
¾ cup granulated sugar
¾ cup brown sugar
1 large egg
2 teaspoons vanilla extract
1 cup canned pumpkin puree
1 cup Nutella
Directions
Preheat oven to 350 degrees. Spray a 9-by-13-inch baking pan with cooking spray. Set aside.
In a medium bowl, whisk together flour, cinnamon, nutmeg, baking soda, and salt. Set aside.
In the bowl of a stand mixer, cream butter and sugars until smooth. Beat in the egg and vanilla until well blended. Add the pumpkin puree. Reduce speed to low, and mix in the flour mixture until just combined.
Spread batter evenly into the prepared pan. Drop tablespoons of Nutella all over the pumpkin cake batter. Swirl in the Nutella with a knife. I wanted the Nutella to stay towards the top, to act as the frosting, so I swirled gently.
Bake for about 35-40 minutes or until the sides pull away from the pan and a toothpick comes out clean. Place cake on a wire rack and cool completely. Cut into squares and serve.
Monday, October 3, 2011
Pumpkin Chocolate Chip Bars
 This recipe will be a staple in my house this fall. You can’t go wrong with pumpkin and chocolate together and these bars are dotted with chocolate chips. The pumpkin bars are soft, moist and have a cake-y texture. They are perfect for dessert or snack time. If you like pumpkin, I bet you will be making this pumpkin chocolate bar recipe over and over this fall.
Pumpkin Chocolate Chip Bars
Makes 24 bars
Ingredients
2 cups all-purpose flour
1 tablespoon pumpkin-pie spice
1 teaspoon baking soda
¾ teaspoon salt
1 cup (2 sticks) unsalted butter, at room temperature
1 ¼ cups granulated sugar
1 large egg
2 teaspoons vanilla extract
1 cup canned pumpkin puree (not pumpkin pie filling)
1 package (12 ounces) semisweet chocolate chips
Directions
Preheat oven to 350 degrees. Grease a 9-by-13-inch baking pan and set aside. In a medium bowl, whisk together flour, pumpkin pie spice, baking soda, and salt; set aside.
With a stand or electric mixer, cream butter and sugar on medium-high speed until smooth; beat in egg and vanilla until combined. Add pumpkin puree and mix well. The mixture will look somewhat curdled. Reduce speed to low, and mix in dry ingredients until just combined. Fold in chocolate chips.
Spread batter evenly in prepared pan. Bake bars for 35-40 minutes or until edges begin to pull away from sides of pan and a toothpick inserted in center comes out with just a few moist crumbs attached.
Cool bars completely in pan. Cut into squares and serve.
Subscribe to:
Posts (Atom)